
Luxury Floors for Less
Beautiful floors at brilliant prices


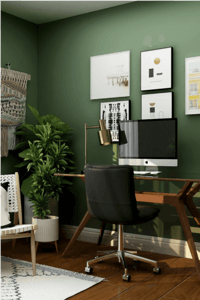
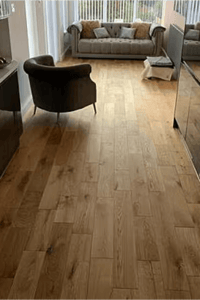
Herringbone wood flooring is a timeless and elegant choice for any home. It adds a touch of sophistication and luxury to any space, and it is surprisingly easy to install. If you are thinking about adding herringbone wood flooring to your home, Easy Step Flooring is the perfect place to start. We have a wide selection of herringbone wood flooring styles and finishes to choose from, and our expert staff can help you find the perfect option for your needs.
Herringbone flooring has a rich historical background, dating back to the Roman Empire, where it was used in building construction. Its timeless elegance and classic appeal have made it a popular choice in interior design for centuries. The distinctive V-shaped pattern of the herringbone block design adds a touch of sophistication and visual interest to any space.
One of the reasons for the popularity of the herringbone floor layer in interior design is its ability to seamlessly blend into both period properties and modern homes. It adds a sense of character and charm to historical buildings while also bringing a touch of luxury and modernity to contemporary spaces.
There are various options available for herringbone parquet flooring, including different types of pieces of wood, finishes, and custom designs to suit individual preferences and interior styles. From traditional oak and parquet designs to more modern stained finishes, herringbone wood floor board offers a versatile range of choices for homeowners and designers to enhance their spaces.
Overall, Herringbone Parquet Flooring continues to be a timeless and elegant choice for interior design, offering a sense of history and sophistication while also adding value and visual interest to any property.
When it comes to installing a new natural flooring manufacturer, proper preparation of the subfloor is crucial to ensuring a smooth and long-lasting result. Whether you're laying carpet, hardwood flooring, tile, or any other type of flooring, the condition of the subfloor will greatly impact the final outcome. By carefully preparing the subfloor, you can correct any imperfections, create a level surface, and improve the overall integrity of the foundation for your new Cortejo Luxury Cork flooring. In this section, we will cover the essential steps and best practices for preparing the subfloor before installing your chosen bamboo flooring material. These steps will help you achieve professional-looking results and ensure the longevity of your new floors.
To assess the condition of the subfloor, first check for levelness using a long, straight piece of wood or a level. Place the tool across various sections of the subfloor to identify any dips or uneven areas. Pay close attention to any sharp changes in level, as these will need to be fixed with leveling material before proceeding with the installation.
Once the levelness is determined, carefully inspect the entire subfloor for any signs of damage or deterioration. Look for rot, moisture damage, or any areas that feel weak or unstable. Address any issues found to ensure the subfloor is entirely level and in good condition before starting the V4 wood flooring installation of the herringbone design pattern.
If there are sharp changes in level, use a self-leveling compound or another appropriate leveling material to smooth out the surface. Allow the leveling material to fully cure before moving forward with the installation.
By thoroughly assessing the subfloor for levelness and addressing any sharp changes in level with proper leveling material, the foundation will be prepared for a successful herringbone installation of the Alpine wood floor pattern.
When repairing any damage or unevenness, start by assessing the extent of the damage and identifying the materials needed for repair. Whether it's cracks in the wall, scratches on furniture, or uneven surfaces, it's important to properly evaluate the situation before beginning any repairs.
After assessing the damage, address any cracks, scratches, or uneven surfaces by filling, sanding, and smoothing the affected areas. Use the appropriate materials for the specific type of damage, whether it's spackling for wall cracks or wood filler for furniture scratches.
Finally, ensure that all repairs are properly dried and hardened before moving on to the next steps. This may involve allowing the filler to dry completely or sanding and smoothing the surface until it's level and seamless.
By following these steps and thoroughly assessing and repairing any damages or unevenness, you can effectively restore the integrity and appearance of the surface.
Installing an underfloor heating system for wooden floors, such as engineered herringbone parquet flooring, requires careful preparation and consideration of temperature requirements. Before installation, ensure the wooden subfloor is dry, level, and free from any debris. It's recommended to use a moisture barrier to protect the luxury wood flooring from damage and to ensure even temperature distribution.
There are two main types of underfloor heating systems suitable for wooden floors: electric underfloor heating and water-based (hydronic) underfloor heating. Electric systems are easier to install and are better suited for retrofit projects, while water-based systems are more efficient and cost-effective for larger areas.
When installing the system, it's essential to follow the manufacturer's guidelines for temperature settings and spacing of the heating elements. For beautiful wooden floors, it's crucial to avoid overheating, as this can lead to damage or warping of the luxury wood flooring. It's recommended to consult with a professional to ensure the underfloor heating system is installed correctly and safely for wooden flooring.
When it comes to any project, whether it's a DIY craft or a construction job, acquiring the right materials and tools is crucial. From purchasing the necessary supplies to ensuring you have the proper equipment on hand, the process of acquiring materials and tools sets the stage for a successful and efficient project. Whether it's measuring and cutting materials, using power tools, or assembling various components, having the right tools for the job can make all the difference. In this section, we will explore the importance of carefully selecting materials, the process of purchasing or gathering them, and the essential tools needed to complete any project effectively and safely. Whether you're a seasoned professional or a novice DIYer, understanding the ins and outs of acquiring materials and tools is a fundamental aspect of any successful project.
Before beginning any project, it is essential to gather all the necessary tools to ensure a smooth and efficient process. For this particular project, you will need a few essential tools, including rafter squares, a measuring tape, and a miter saw.
Rafter squares are a crucial tool for marking and measuring angles, while a measuring tape is necessary for accurately measuring dimensions and lengths. A miter saw is essential for making precise and accurate cuts, especially when working with bespoke wood flooring or other materials.
Before moving on to the next steps of the project, be sure to gather all of the required tools. This will prevent any delays or interruptions during the project and ensure that you have everything you need to complete the task at hand.
In summary, gathering the necessary tools, such as rafter squares, a measuring tape, and a miter saw, is vital for the success of the project. By ensuring that you have all the tools you need before beginning, you can proceed with confidence and efficiency.
When it comes to herringbone V4 wood flooring, there are several types to choose from, each with its own unique features and characteristics. Bespoke Herringbone 9102 offers a light and airy finish, while Bespoke Herringbone 9109 provides a more dramatic effect. Venice Natural boasts pale gold tones, while Westminster Old English exudes aged character. Modena Natural, on the other hand, offers an elegant and understated design.
In terms of plank widths and finishes, there are various options available for each type of herringbone floor installation. You can select from different plank widths to suit your desired aesthetic, as well as a range of finishes to complement your overall design scheme.
Ultimately, choosing the right type of herringbone wood flooring manufacturer comes down to considering the unique features and characteristics offered by each type, as well as the plank widths and finishes available. By carefully assessing these factors, you can select the perfect herringbone V4 wood flooring spline to enhance the beauty of your space.
When selecting a suitable border piece for added visual appeal, it is important to consider the overall color scheme, style, and size of the space. Look for a piece that complements the existing dÃÂécor and adds visual interest. Consider the colors and patterns in the room and choose a border piece that will accentuate and enhance the space. For example, if the room has a neutral color scheme, a border piece with a pop of color can add visual interest and create a focal point. Additionally, consider the style of the space—whether it is modern, traditional, or eclectic—and select a border piece that aligns with the style to create a cohesive look. The size of the border piece is also important; it should be proportionate to the size of the space and not overwhelm the room. Ultimately, the right border piece can tie the room together, add a finishing touch, and elevate the overall visual appeal of the space.
When it comes to designing and creating a functional and aesthetically pleasing space, it all begins with accurate measurements and careful planning of the layout. Whether you're remodeling a room in your home or designing a brand new space, taking the time to measure and plan the layout effectively is crucial. A well-thought-out layout not only ensures that everything fits and flows seamlessly, but it also sets the stage for successful furniture placement, traffic flow, and overall design cohesion. In this section, we'll discuss the importance of accurate measurements, the tools and techniques for taking precise measurements, and the key considerations to keep in mind when planning the layout of any space. Whether you're a seasoned interior designer or a DIY enthusiast, understanding the fundamentals of measuring and planning the layout is essential for any successful design project.
To determine the size and dimensions of a room, the first step is to use a tape measure to measure the length and width of the room. It is important to take into account any irregularities, such as non-straight walls or obstructions, that may affect the measurements. Once the dimensions are determined, use chalk to mark out the borders and the center of the room. If a herringbone pattern is to be accommodated, extra care should be taken to ensure that the dimensions and markings are adjusted accordingly.
Measure and mark the room accurately, ensuring that the lines are straight and true to maintain the beautiful herringbone-patterned parquet wood flooring. Pay careful attention to any irregularities in the walls or obstructions that may affect the placement of the pattern. By strictly following the markings and dimensions, the room will be properly prepared for the installation of the herringbone pattern. This meticulous process will ensure that the final result is visually appealing and accurately fits the space.
To calculate the amount of luxury flooring needed for a room, start by measuring the length and width of the space in feet. Then, multiply the length by the width to get the total square footage. For instance, if the room is 10 feet by 12 feet, the total square footage would be 120 square feet.
When ordering luxury flooring, it's a good idea to order extra to account for any mistakes during installation or for potential future repairs. It's recommended to order at least 10% extra flooring to accommodate any unforeseen circumstances.
In summary, to calculate the number of packs of flooring needed:
1. Measure the length and width of the room.
2. Multiply the length by the width to obtain the total square footage.
3. Consider ordering at least 10% extra flooring for any mistakes or future repairs.
By following these steps and considering the possibility of extra flooring, you can ensure that you have enough materials for your project and avoid any potential delays or issues.
When deciding on the direction and angle of a herringbone wood floor pattern for engineered parquet flooring adhesive, it is crucial to consider the focal point of the room. Whether it is a fireplace or a bay window, the herringbone pattern should lead towards this focal point to create a visually appealing effect. Additionally, when laying out the pattern in multiple rooms, it is standard practice to fit the engineered, beautiful herringbone parquet floor lengthwise of the room for a more cohesive look.
To achieve the desired direction and angle, use a chalk line tool and painter's tape to mark the 45-degree angle and align the boards with the working couple of lines. This will ensure that the beautiful herringbone floor pattern is laid out in the desired direction and angle for the best visual effect. By carefully considering the focal point and room layout, you can create a stunning herringbone parquet wood flooring pattern that adds elegance and sophistication to any space.
When starting an installation with a straight edge, it's important to ensure precise and accurate measurements and markings in order to achieve a professional finish. Using a straight edge is crucial in ensuring that the first row of tiles, planks, or any material laid down is completely straight, which sets the foundation for the rest of the project. Proper preparation, attention to detail, and the use of the right tools will help to make the installation process smoother and more successful.
When establishing a straight edge as a reference line, it is crucial to ensure accuracy and precision in all measurements and drawings. To start, gather a ruler, T-square, or straight edge tool to use as the reference line. Position the straight edge along the desired line, ensuring it is perfectly aligned with the intended path. Once in position, secure the straight edge in place to prevent any shifting during use. This can be done by using clamps, weights, or tape to firmly hold the straight edge down. After securing the straight edge, proceed with drawing or measuring along the established reference line for precise results. By using a straight edge and taking the time to secure it properly, you can trust that your measurements and drawings will be accurate and consistent. Remember the keywords covered here: straight edge, reference line, ruler, T-square, accuracy, and precision.
Experience the rich history and captivating beauty of herringbone wood flooring with Easy Step Flooring. This classic pattern, dating back to the Roman Empire, continues to be a popular choice for interior design, adding a touch of character and charm to both historical buildings and contemporary spaces.
Get a free quote.


This product has now been removed from your favourites.