


Luxury Floors for Less
Beautiful floors at brilliant prices


Tired of outdated or damaged tiles? Don't replace them entirely - upgrade them elegantly! LVT flooring offers a unique opportunity to transform your space without the hassle and cost of complete removal. This guide delves into the exciting world of replacing tiles with LVT.
When it comes to installing tile flooring, it's important to have the necessary tools on hand to ensure a smooth and successful installation. Here's a list of the important tools that you'll need for the job:
1. 100-lb. Roller: This heavy-duty roller will be used to ensure that the tiles are firmly pressed into the adhesive, creating a strong bond and preventing any air bubbles from forming.
2. Belt Sander: A belt sander will be necessary for smoothing out any uneven surfaces or rough edges before laying down the tile.
3. Caulk Gun: This tool will be used to apply the necessary caulk or sealant around the edges of the tiled area to prevent water damage and to give the installation a finished look.
4. Chalk Line: A chalk line will help you establish straight and accurate guidelines for laying down the tiles, ensuring a professional finish.
5. Compass: A compass will come in handy for cutting tiles to fit around any odd-shaped areas or obstacles, ensuring a precise and custom fit for every tile.
With these tools at your disposal, you'll be well-equipped to tackle the installation of your tile or vinyl flooring with confidence and precision.
Luxury vinyl tiles (LVT) are a popular flooring option known for their durability and easy maintenance. There are different types of LVT with various installation methods.
Click or lock LVT features interlocking edges that snap together, making it a great option for DIY installation. Glue-down LVT requires adhesive to be applied to the subfloor before the tiles are placed, typically requiring professional installation. Loose-lay LVT simply lays on the subfloor without any adhesive or locking mechanism, making it easy to install and replace.
The Valinge 5G Click system is a specific type of click-and-lock installation method known for its easy and fast installation. It features a patented locking system that securely connects the tiles without the need for adhesive.
Each installation method differs in terms of ease of DIY installation, with click and lock being the most DIY-friendly, while glue down usually requires professional installation. Subfloor requirements also vary, with glue-down LVT needing a perfectly smooth or dry subfloor, while click-and-lock and loose-lay LVT can often be installed over existing luxury vinyl flooring.
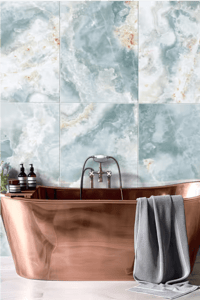
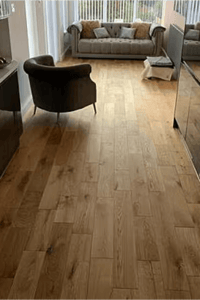
Many homeowners and businesses are opting to replace traditional tiles with Luxury Vinyl Tile (LVT) for several reasons. LVT offers the look of real wood or real stone at a fraction of the cost, making it an attractive and budget-friendly option. In addition, LVT is highly durable, scratch-resistant, and easy to maintain, making it a practical choice for high-traffic areas. Its water-resistant properties also make it an ideal luxury vinyl flooring option for kitchens, bathrooms, and basements. Furthermore, LVT is available in a wide range of designs and styles, allowing for endless customization and personalization. With its versatility, affordability, and durability, it's no wonder why many are choosing to replace traditional tiles with LVT.
The current flooring materials in the space include linoleum and ceramic tiles. The linoleum is in fair condition with some signs of wear and tear, and the ceramic tiles are uneven with a few cracked pieces. These irregularities may affect the new installation and need to be addressed.
To assess whether to keep the hard vinyl floor coverings in place or remove them, a thorough inspection is necessary. This involves checking for any signs of water damage, concrete subfloor unevenness, or loose tiles. A level can be used to check for any uneven areas, while a moisture meter can determine if there is any water damage present.
If the linoleum and tiles are found to be in good condition and level, they may be suitable for keeping in place for the new flooring installation. However, if there are significant irregularities or damage, it may be necessary to remove the existing hard vinyl floor coverings before proceeding with the new flooring.
Tools and equipment needed for the assessment include a level, a moisture meter, and safety gear such as gloves and knee pads for kneeling and inspecting the flooring closely. These tools are essential for accurately evaluating the condition of the current flooring materials.
Upon examining the existing tile flooring, it is evident that the grout lines are generally in good condition with minimal signs of wear or discoloration. However, there are a few cracked and missing tiles in certain areas, particularly in high-traffic zones. The grout lines are relatively thin, with no wide or deep seams that would necessitate the use of an underlayment.
In terms of suitability for direct installation of vinyl, the majority of the tile flooring is in good enough condition to proceed without major repairs. However, the areas with cracked or missing tiles will require filling and levelling to ensure a smooth surface for the vinyl installation. It is recommended to carefully address these damaged areas before proceeding with the new concrete floor installation.
Overall, the existing tile flooring is in fair condition, with the main concern being the cracked and missing tiles that need attention before the installation of luxury vinyl tile flooring.

Before beginning the installation of Luxury Vinyl Tiles (LVT), it is important to determine if the current floor is suitable for this type of installation. Several factors need to be considered, including the condition of the existing floor, its levelness, and the type of material it is made of. By carefully inspecting these factors, you can ensure a successful and durable LVT installation.
Preparing for LVT installation involves several important steps. First, it's essential to consider the weight of heavy objects, cabinets, and other furniture in the space. It may be necessary to remove these items or temporarily relocate them to ensure a smooth installation process. Additionally, it's important to factor in the cost of the installation, including labor, materials, and any additional services required.
Choosing the right type of LVT for your space is crucial. Consider factors such as foot traffic, moisture levels, and the overall aesthetic of the room. The cost of the LVT itself can vary depending on the quality and style chosen.
The average costs associated with LVT flooring fitting can include prices for the LVT material, herringbone pattern installation (if desired), floor surface preparation, installation labor, underlayment, and waste removal. These costs can vary correct base on the size of the space and any additional services required.
In conclusion, preparing for LVT installation involves careful consideration of heavy items in the space, cost considerations, and selecting the right type of LVT for the area. Understanding the potential costs involved in installation is crucial to budgeting effectively for the project.
When it comes to getting a room ready for a new purpose or simply to create more space and organization, clearing out furniture and obstacles is a crucial first step. This process involves removing old or unnecessary pieces of furniture, clearing out any clutter or obstacles that disrupt the flow of the room, and creating an open and clean space. Whether it's for a home renovation, a new design concept, or just general decluttering, clearing out furniture and obstacles from a room is an essential task that sets the stage for the next steps in transforming the space.
To remove old vinyl tiles, start by using a heat gun or hairdryer to warm the vinyl, which will soften the adhesive and make it easier to remove. Once the vinyl is warmed, run a blade along the joint of each tile to loosen it, and then lift up each tile with a floor scraper. After the tiles are removed, you'll need to scrape away any remaining adhesive and clean the concrete slab thoroughly.
Once the concrete slab is clean, it's important to seal it with a product like Prime Plus to ensure a smooth and even surface for the new tiles. After the Prime Plus has dried, you can proceed with tiling as normal, using a high-quality adhesive to secure the new tiles in place.
This process of removing old vinyl tiles and preparing the concrete slab for new tiling is essential to ensure that the new tiles adhere properly and result in a durable and long-lasting floor surface. By using the right tools and products, you can effectively remove old vinyl tiles and create a clean and suitable surface for installing new tiles.
To begin the process of removing old vinyl tiles using a floor scraper, start by locating a joint between two tiles. Place the blade of the floor scraper at the joint and carefully run it along the straight edge to gently lift the tile. Once the first tile is lifted, continue using the floor scraper to lift each tile one by one.
After all the tiles are removed, use the floor scraper to scrape away as much of the adhesive as possible from the concrete slab. This may require some elbow grease, but it is important to clear as much of the adhesive as possible to ensure a smooth surface for the new laminate flooring.
Once the sensitive adhesive is scraped away, thoroughly clean the concrete slab to ensure any remaining residue is removed. A solution of warm water and gentle soap can be used to clean the surface, followed by a rinse with clean water.
Following these steps will provide a clean and adhesive-free surface for the installation of new flooring.
When installing tile, it is important to ensure that the grout lines are clean, even before proceeding with the next steps. Clean and even grout lines not only enhance the overall appearance of the tile installation but also help to ensure the longevity of the grout. By carefully preparing the grout lines before moving on, you can avoid potential issues and achieve a professional-looking result. The following headings will outline the key steps to ensuring that your grout lines are clean and even, providing a solid foundation for your floor tile project.
Before installing any new flooring, it is crucial to properly prepare the subfloor to ensure a durable and long-lasting finish. Start by thoroughly cleaning the subfloor with warm water and a mild detergent to remove any dirt, grease, or debris. This will create a clean, smooth, or flat surface for the new flooring to be installed on.
Next, inspect the subfloor for any damage or imperfections, such as cracks, uneven areas, or rot. Repair or replace any damaged sections as needed to ensure a solid and stable base for the flooring.
After cleaning and repairing the subfloor, it is important to check for excess moisture. Use a moisture meter to determine if the subfloor has any moisture issues that could cause problems for the new flooring. If excess moisture is present, address the issue before proceeding with the installation.
By following these steps for subfloor preparation, you can ensure that your new flooring will have a strong and secure foundation, free of any potential issues that could affect its performance.
When inspecting the concrete or wooden subfloor for any damage or imperfections, it is important to carefully examine the surface for any signs of wear and tear. Look for holes, cracks, and uneven areas that may compromise the integrity of the subfloor. Use an appropriate filler for minor damages such as small holes or shallow cracks. Consider removing and replacing any significant cracks that could pose a risk to the stability of the subfloor.
It is also crucial to check for excess moisture in the subfloor. Excess moisture can lead to mold and mildew growth, as well as damage to any flooring material installed on top of the subfloor. Ensure the subfloor is completely dry before moving on to any further steps in the construction or renovation process.
Overall, a thorough subfloor inspection is necessary to ensure a sturdy and reliable foundation for any flooring project. Identifying and addressing any potential issues early on can help prevent future complications and ensure the longevity of the flooring.
Before installing luxury vinyl tile (LVT), it is crucial to ensure that the subfloor is smooth and free from any cracks or uneven areas. Patching up any imperfections in the subfloor will provide a stable and level surface for the LVT installation, ultimately resulting in a more polished and professional-looking final result. In this article, we will discuss the steps and materials needed to effectively patch up cracks and uneven areas in preparation for LVT installation.
When preparing to install LVT flooring over underfloor heating, it is crucial to consider the potential impact of excessive moisture on both the flooring and heating systems. Before laying the underlay and LVT, the subfloor must be thoroughly cleaned, smooth, dry, and level to ensure a proper installation.
When considering underfloor heating, it is important to choose an LVT product that is compatible with the heating system. Some types of LVT may not be suitable for use with underfloor heating, so it is essential to carefully research and select a product that is designed to withstand the temperature fluctuations associated with this type of heating.
Additionally, excessive moisture can cause damage to both the LVT flooring and the underfloor heating system. It is crucial to ensure that the subfloor is free from moisture before installation, and to take precautions to prevent moisture from affecting the flooring and heating systems over time.
In summary, when preparing to install LVT flooring over underfloor heating, be sure to consider the compatibility of the LVT product with the heating system, and take steps to prevent moisture-related damage by thoroughly preparing the subfloor and selecting the appropriate materials.
Get a free quote & find out how much you could save by switching to LVT. Browse our extensive LVT collection & find the perfect replacement for your tiles today!


This product has now been removed from your favourites.