

Luxury Floors for Less
Beautiful floors at brilliant prices


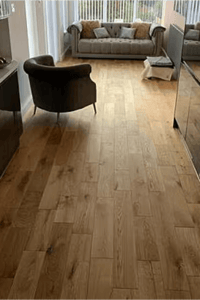
With DIY flooring projects, you can update the appearance of your house without going over budget. From concrete to hardwood, this guide covers everything you need to know to confidently tackle your flooring project and create a space you'll love.
Updating your flooring is a great way to start if you want to give your home a fresh look. DIY flooring projects are a cost-effective way to transform your space, and they can also be a fun and rewarding way to put your DIY skills to the test. In this blog, we'll explore the benefits of DIY flooring projects, the types of flooring to consider, and some DIY project ideas to get you started.
There are several benefits to taking on a DIY flooring project. First and foremost, it can save you a significant amount of money. By doing the work yourself, you can avoid the cost of hiring a professional installer. Additionally, you can save money on materials by shopping for the best deals and using coupons or discounts.
Another benefit of DIY flooring projects is having more control over the outcome. When you hire a professional, you rely on their expertise to ensure the finished product meets your expectations. When you do the job yourself, you have the flexibility to make changes to ensure that the outcome is precisely what you intended.
Finally, DIY flooring projects can be a great way to develop your skills as a DIYer. Taking on a challenging project allows you to learn new techniques and develop new skills for future projects.
Skill Level Needed To Install
The skill level needed to install DIY flooring can vary depending on your chosen flooring. Some projects may require advanced skills and tools, while beginners can complete others. For example, installing vinyl plank or laminate flooring can be an excellent option for those new to DIY projects, as they are easy to install and require minimal tools. On the other hand, installing hardwood flooring may require more advanced skills and specialized tools.
Special Tools Needed
Depending on the kind of flooring you choose, you'll need a different set of tools for your DIY flooring tasks. Essential tools such as a saw, hammer, measuring tape, and level are typically needed for most projects. However, some projects may require specialized tools such as a tile cutter or floor sander. Researching the specific tools necessary for your project before starting ensures you have everything you need.
DIY Project Ideas
You can tackle various DIY flooring projects to give your home a new look. Here are some ideas to get you started:
Painted Concrete Floors
Transform a dull concrete floor by painting it with a bold colour or pattern. This is an excellent option for those on a budget, as it requires minimal materials and tools.
Stenciled Concrete Floors
Create a unique design on your concrete floor using a stencil and paint. This project requires more skill and patience but can be the best way to personalize your space.
Epoxy Coated Concrete Floors
Epoxy coating can provide your concrete floor with a sleek and modern look. This project requires more specialized tools and materials but can be an excellent option for a durable, long-lasting solution.
No matter which DIY flooring project you choose, be sure to do your research and gather all the necessary tools and materials before getting started. With a slight effort, you can transform your space and create a home you'll love for years.
Installing Hardwood Floors Step-by-Step Guide
Once the subfloor is ready, you can begin installing hardwood floors. Here's a step-by-step guide:
Measuring the Room and Buying Materials
Start by measuring the room to determine how much flooring you'll need. You'll also need to purchase any necessary materials, such as hardwood planks, underlayment, and finishing products.
Removing Old Flooring and Prepping Subfloor
Next, remove any old flooring and prepare the subfloor as described above.
Installing Underlayment and Laying Planks
Once the subfloor is ready, install the underlayment and lay the hardwood planks. Follow the manufacturer's instructions for the specific flooring you're installing.
Applying a Coat of Finish to Protect the Wood
Finally, apply a finish coat to protect the wood and give it a polished look. Remember to adhere to the manufacturer's guidelines for your finished product.
By following these steps, you can install hardwood floors in your home with confidence and enjoy the beauty and durability of this classic flooring option.
Inexpensive Flooring Options To Consider
If you are on a limited budget, there are still plenty of options for updating your flooring. Here are a few inexpensive flooring options to consider:
Vinyl plank flooring: Vinyl plank flooring is a cost-effective and adaptable option that can mimic the look of hardwood or tile. It's also easy to install and maintain.
Laminate flooring: Laminate flooring is another budget-friendly option that can give your home the look of hardwood without the cost. It's also durable and easy to install.
Carpet tiles: Carpet tiles are affordable for those looking for a soft flooring option. They're easy to install and can be customized to fit any space.
Painted concrete: If you have a concrete subfloor, painting it can be a cost-effective way to add colour and interest to your space.
Preparing the Subfloor Before Tiling
First, ensure that your subfloor is clean, dry, and level. Remove any debris or adhesive residue and fill any cracks or dips.
Choosing The Right Tile For Your Project
Numerous tile options exist, such as ceramic, porcelain, and natural stone. When selecting, consider the room's traffic, the tile's durability, and the colour and design options.
Setting Out The Pattern and Making Cuts with a Utility Knife
Determine the best layout for your tiles, and use a chalk line to mark your starting point. Use a tile cutter or a wet saw to cut your tiles to fit around corners or obstructions.
Laying Down The Tiles Securely
Apply adhesive to the subfloor and lay your tiles in the desired pattern, using spacers to ensure even spacing. Remove the spacers when the bond has had time to dry completely before adding grout to the spaces.
Adding a Pop Of Color With Vinyl Tiles
Use vinyl tiles as accents or borders to add colour or pattern to your tile floor. These can be easily cut to size and adhered to the existing tile with an adhesive.
Cabinet Doors and Other Accessories
To complete the look of your new tile floor, consider adding new cabinet doors or other accessories that add the colour and style of the tile. If you have existing cabinets, you may paint or stain them to match the new flooring.
When to Hire a Professional Installer
When deciding whether to hire a professional installer or tackle the project yourself, consider the following pros and cons:
Pros
Expertise in installation techniques and tools
Guaranteed artistry and product warranties
Faster installation time
Cons
Higher cost of labour and materials
Less control over the project timeline and design decisions
Hiring a professional or DIY depends on your budget, timeline, and personal preferences. A DIY tile floor installation can be rewarding and cost-effective with the right tools and preparation.
In conclusion, DIY flooring projects are a terrific opportunity to improve your DIY skills while updating your home's appearance. There are various flooring options, each with advantages and disadvantages. The secret is to take your time and meticulously adhere to the manufacturer's directions, whether tackling a concrete flooring project or installing hardwood floors. You can design a lovely, personalized space you'll love for years with time and effort.
Ready to take on your DIY flooring project? Let Easy Step Flooring UK help you bring your vision to life. With a wide range of high-quality flooring options and expert advice, we've got everything you need to transform your space. Please browse our selection and start your journey to a new and improved home today!
Frequently Asked Questions
Q. What are the benefits of DIY flooring projects?
A. DIY flooring projects can save you money and give you the satisfaction of accomplishing a task independently. They also allow you to customise your space and give your home a new look without hiring a professional.
Q. What types of flooring are best for DIY projects?
A. Some of the best types of flooring for DIY projects include laminate, vinyl plank, and engineered hardwood. These materials are easy to work with and can be installed using essential tools.
Q. What skill level is needed to install DIY flooring?
A. The skill level needed to install DIY flooring can vary depending on your chosen flooring. Some projects may require advanced skills and tools, while beginners can complete others.
Q. What special tools are needed for DIY flooring projects?
Different tools will be required for DIY flooring jobs depending on the type of flooring you select. Essential tools such as a saw, hammer, measuring tape, and level are typically needed for most projects. However, some projects may require specialized tools such as a tile cutter or floor sander.
Q. What are some cheap flooring options to consider?
A. Vinyl plank and laminate flooring are great options for those on a budget. These materials approximate the appearance of more expensive materials like hardwood and tile while being more affordable.
Q. Should I do it myself or hire a professional installer?
A. Whether to hire a professional installer or do it yourself depends on your skill level and the project's complexity. If you have experience and feel confident in your abilities, DIY may be the way to go. However, hiring a professional may be better if the complex project requires specialized tools.
Q. How can Easy Step Flooring UK help with my DIY flooring project?
A. Easy Step Flooring UK offers a wide range of high-quality flooring options and expert advice to help you bring your vision to life. Our team can assist you in choosing the appropriate flooring for your project and walk you through the installation procedure.


This product has now been removed from your favourites.