


Luxury Floors for Less
Beautiful floors at brilliant prices


Vinyl flooring is a popular option that provides a stylish and durable solution for any room in your home. From its realistic appearance to its ease of maintenance, vinyl flooring offers many advantages for homeowners. This blog will provide a detailed guide on how to lay vinyl flooring. Whether you're a seasoned DIYer or a first-time flooring installer, this guide will help you achieve professional results in your home.
Vinyl flooring is a synthetic material made from PVC (polyvinyl chloride) resin. It is available in a wide range of colours, styles, and designs and can imitate the look of natural materials such as hardwood, stone, and tile.
Vinyl flooring is an excellent choice for many reasons. Some of its key advantages include the following:
There are two main categories of vinyl flooring: sheet vinyl and vinyl tiles. Sheet vinyl is sold in large rolls and is a good choice for larger rooms as it requires fewer seams. Vinyl tiles are sold in individual tiles and are an excellent option for smaller spaces or for creating a custom pattern.
When selecting your vinyl flooring, choose a product that suits your room and flooring requirements. Consider the thickness of the product, the finish, and the design.
Underlayment is an optional but recommended step that provides a smooth, even surface for your vinyl flooring. This will help to lower the risk of bubbles or wrinkles in your vinyl flooring.
A measuring tape is used to accurately measure your room and determine the amount of vinyl flooring you need.
A utility knife is used to cut the vinyl flooring to size.
A straight edge guides the utility knife and ensures consecutive cuts.
The adhesive is used to secure the vinyl flooring to the underlayment. Choose a product that is suitable for your flooring and your subfloor.
A trowel is used to apply the adhesive to the underlayment.
A notched trowel is used to apply the adhesive evenly over the underlayment.
A seam roller is used to apply pressure to the seams between the vinyl flooring tiles.
Flooring trim covers the edges of the vinyl flooring and gives a neat, finished appearance.
It is made of silicone. To seal the edges of the flooring trim, silicone caulk is used.
Before you start laying your vinyl flooring, it is essential to properly prepare the room and gather all of the necessary materials. Proper preparation will help to ensure that your vinyl flooring is installed correctly and that it will look great for years to come.
The first step in preparing for your vinyl flooring installation is to prepare the subfloor. The subfloor is the surface on that the vinyl flooring will lay. It should be clean, dry, level, and debris-free. If necessary, repair any cracks or holes in the subfloor and ensure it is level and smooth. This will help to ensure that the vinyl flooring lies flat and doesn't warp or buckle over time.
Before ordering your vinyl flooring, it is essential to accurately measure the room in which it will install. Measure the room's length and width and then multiply these measurements to determine the total square footage. That will help you to determine how much vinyl flooring you will need to order. Add 10-15% to your order to allow for waste, cuts, and any necessary overage.
Once you have measured the room and determined how much vinyl flooring you need, it is time to order the flooring. Be sure to call enough to cover the entire room, plus any necessary overage. When ordering, consider the vinyl flooring's colour, pattern, and texture and ensure that it will match the room's decor.
Before installing your vinyl flooring, allowing it to acclimate to the room is essential. You should enable the flooring to sit in the room for at least 24 hours to adjust to the environment's temperature and humidity. That will help to prevent any warping or buckling of the flooring once it has been installed.
By following these preparation steps, you can ensure that your vinyl flooring installation goes smoothly and that the result is professional-looking and long-lasting. Whether installing vinyl flooring for the first time or replacing your existing flooring, preparing the room and gathering the necessary materials will help you achieve the best possible results.
Use a measuring tape and a straight edge to measure and mark the vinyl flooring to size. Cut the vinyl flooring using a utility knife, following the markings you have made. Repeat this process until you have enough pieces to cover the entire room.
Using a trowel and a notched trowel, spread the adhesive evenly over the underlayment, following the manufacturer's instructions. Apply enough glue to secure the vinyl flooring, but not too much so that it will squeeze out from the seams.
Carefully lay the vinyl flooring, making sure to overlap the edges and align the seams. Use a seam roller to apply stress to the seams, which will help to secure the vinyl flooring and prevent it from lifting or separating.
Use flooring trim to cover the edges of the vinyl flooring and give it a neat, finished appearance. Seal the edges with silicone caulk to prevent water from seeping in and causing damage.
To keep water from seeping into the seams of your vinyl flooring and causing damage, it is essential to seal them properly. Using silicone caulk, apply a bead of caulk along the edges of the vinyl flooring where the seams meet the wall. Smooth the caulk with your finger and allow it to dry completely. That will create a waterproof seal that will help to prevent water damage and prolong the life of your flooring.
To give your vinyl flooring a neat, finished appearance, installing flooring trim around the room's perimeter is essential. Flooring trim is a narrow strip of material that covers the raw edges of the flooring and helps to hide any gaps or seams. To install the flooring trim, place it along the wall and secure it with adhesive. Finish by applying a bead of silicone caulk along the top of the trim to create a seamless, water-resistant seal.
By sealing the seams and installing flooring trim, you can ensure that your vinyl flooring will look great for years to come and be protected from water damage. Whether installing vinyl flooring for the first time or replacing your existing flooring, these steps are an essential part of the installation process and will help you achieve professional-looking results.
Once your vinyl flooring has been installed, it's essential to take proper care of it to ensure its longevity and maintain its appearance. Here are a few tips for maintaining and caring for your vinyl flooring:
Vinyl flooring is relatively easy to clean, but using the right cleaning products is essential to avoid damaging the surface. Avoid using harsh chemicals, abrasive cleaners, or scrub brushes, as these can scratch the surface. Instead, use a mild detergent and water or a manufacturer-recommended cleaner. Avoid excessive moisture, as this can cause the flooring to warp or buckle.
To prevent scratches and scuffs on your vinyl flooring, it is essential to protect it from heavy foot traffic, furniture, and pet claws. Use door mats & area rugs in high-traffic areas, the place felt pads under furniture legs, and clip your pet's nails regularly. You can also consider using a protective clear coat or wax on your vinyl flooring to help protect it from wear and tear.
If your vinyl flooring becomes damaged, it is essential to repair it promptly to prevent further damage. Minor cuts and scratches can be filled with vinyl filler and then sanded smoothly. Larger holes and tears can be patched with vinyl flooring and then sealed with adhesive. If the damage is too extensive, replacing the affected flooring pieces may be necessary.
Following these maintenance and care tips will help keep your vinyl flooring looking great for many years. Whether installing new flooring or just upgrading your existing flooring, vinyl flooring is an excellent choice for its durability, versatility, and style.
In conclusion, laying vinyl flooring is a project that most do-it-yourselfers can tackle with patience and attention to detail. Each step of the process is essential to ensure a successful installation, from preparing the subfloor and measuring the room, to laying the vinyl tiles or planks and sealing the seams.
Here are a few tips to help ensure a successful vinyl flooring installation:
Following these guidelines will ensure a successful vinyl flooring installation that will last for years. Whether installing vinyl flooring for the first time or replacing your existing flooring, taking the time to do the job right will pay off in the end.
Q: What tools do I need to install vinyl flooring?
A: To install vinyl flooring, you will need a few essential tools, such as measuring tape, a utility knife, a straight edge, a rolling pin or floor roller, a cutting mat, and a chalk line. You may also need a jigsaw or a circular saw to cut the vinyl tiles or planks.
Q: Can I install vinyl flooring over an existing floor?
A: In most cases, you can install vinyl flooring over an existing floor, provided that the existing floor is clean, dry, and level. However, it is always best to check with the vinyl flooring manufacturer to see if they have any specific recommendations or requirements.
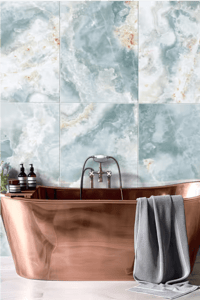
Q: Can I install vinyl flooring in a bathroom?
A: Yes, you can install vinyl flooring in a bathroom, provided that it is waterproof and installed correctly to prevent water from seeping underneath.
Q: How long does luxury vinyl flooring last?
A: Luxury Vinyl flooring is known for its durability and long lifespan. With proper care and maintenance, luxury vinyl flooring can last up to 20 years.


This product has now been removed from your favourites.