


Luxury Floors for Less
Beautiful floors at brilliant prices


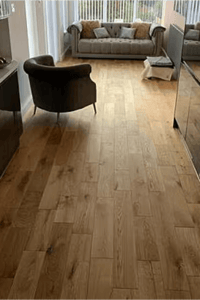
Discover the Beauty and Versatility of Engineered Wood Floors
Engineered wood flooring has become increasingly popular as a durable and beautiful option in recent years. It is created by cross-grain joining several layers of wood together. The top layer is high-quality solid wood, usually oak, maple, hickory, or exotic species. Underneath are several layers of plywood that provide stability and help minimize expansion and contraction.
The cross-laminated structure makes engineered floors ideal for installing below-grade or on concrete floors. They can also be used over radiant heat systems, as they are more dimensionally stable than solid wood. Engineered wood provides the classic beauty of real hardwood with increased versatility for varied installations.
Many benefits make engineered floors a great choice:
For these reasons, engineered flooring has surpassed solid hardwood in popularity for residential installations. The advanced manufacturing allows for greater stability and options for challenging subfloors.
Proper planning and preparation are important for a successful engineered flooring installation. Here are the key steps:
Always measure the room carefully, including width, length, and irregular shapes or alcoves. Add up the square footage to determine how much flooring you need. Include an extra 10% for cutting waste.
Consider removing existing baseboards and thresholds to install the flooring underneath for a seamless look. This also allows installing full planks against the wall rather than ripening narrow pieces.
In addition to the room size, consider these factors when calculating how much flooring to purchase:
Many flooring retailers have website planning tools to help estimate the quantity needed.
Proper subfloor prep is the most important step for a successful installation. The subfloor must be:
Test moisture content with a meter for concrete subfloors and address any excess moisture issues. New concrete should be cured for at least 60 days before installation.
Most engineered floors are installed over some underlayment material. Options include:
Roll out underlayment in the same direction as the flooring planks. Run it up the wall slightly, then trim back after installing. This helps isolate the floor from any wall moisture.
Engineered wood flooring installation over wood or concrete subfloors using staple, nail, glue-down, or floating methods. Each has pros and cons:
One installation method is applying wood flooring adhesive to the subfloor and then fitting planks together without nailing or fastening. This is called a groove joint or straight-edge installation.
Downsides are longer installation time and the chance of joints separating if adhesive bonds fail. This popular method works best for smaller spaces.
Nailing or stapling through the tongue edge can install many engineered products. This provides a fast installation comparable to laminate flooring.
Potential issues include slight nailing marks along the seams and noise transfer through the fasteners. Use specialized nails and staplers made for engineered flooring installation.
Applying flooring adhesive to the subfloor is a popular technique for engineered planks. It bonds the boards securely and reduces noise transfer.
Be sure to use adhesives approved for engineered flooring. Follow open times and proper trowel sizes. Clean up adhesive promptly.
Some engineered flooring has an angle-angle locking system, allowing a floating installation. Boards click together on all sides without nails or glue.
Use floating floors only if the manufacturer recommends, as they are prone to slight vertical movement. Underlayment quality is very important to minimize noise.
For finishing touches:
After installation, follow these tips:
Transform your home with Easystep Flooring UK - Make your flooring dreams come true!
With proper installation and care, your beautiful new engineered wood flooring will provide lasting performance and great looks for years to come!
A. Engineered wood is more stable, can be installed over radiant heat systems, and is available in wider planks than solid wood. It provides a real wood look with added versatility.
A. The top layer has the same quality hardwood floors as solid floors. When maintained properly, engineered wood is durable and resists scratches and dents.
A. Depending on the thickness of the top wood layer, engineered floors can be sanded and refinished multiple times. After years of use, this allows for renewing the appearance.
A. Each has pros and cons. Solid wood flooring offers more customization and very thick planks. But engineered provides better stability and installation options. Consider your needs and project details.
A. The glue-down method involves applying adhesive directly to the subfloor before setting the engineered planks. This bonds the boards securely, reduces noise transfer, and creates a smooth surface. Be sure to use adhesives approved for engineered floors.
A. Yes, expansion spacers are important to maintain even gaps around the perimeter and between plank runs. This allows room for wood natural movement from humidity changes. Remove spacers after the flooring is installed.
A. A damp-proof membrane is a thin plastic film layer that goes under the flooring to prevent moisture level from the subfloor from seeping through. It adds a protective barrier against condensation, spills, or high humidity.
A. Many flooring brands have detailed installation guides specific to their products, including helpful steps and tips. Retailers like Easystep Flooring UK have extensive resources and guides to ensure success.
A. Serrated nails have a rough, sawtooth edge that securely grips the flooring plank's tongue. The serrations hold the plank in place to prevent squeaking and give a strong wood-to-wood connection.


This product has now been removed from your favourites.