Blog

How To Lay Solid Wood Flooring

August 26, 2023

Ready to upgrade? This detailed guide makes installing solid hardwood floors a successful DIY project. Your home deserves them!

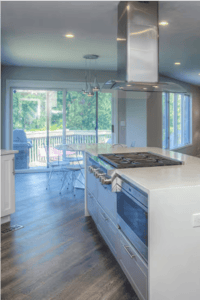
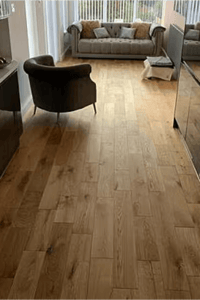
Solid wood flooring can transform the look and feel of any room in your home. Solid wood's rich, natural beauty adds warmth and character that laminates or tiles can't match. Installing wood floors yourself is a satisfying DIY project that can save you thousands over the cost of professional installation. Follow this comprehensive guide to install beautiful new solid wood flooring in your home.

Reasons to Choose Solid Wood Flooring

There are many good reasons to select solid wood as your new flooring material:

  • Timeless aesthetic - Solid wood's grain patterns and natural variations create an appealing look that has stayed popular for centuries. Wood floors suit both traditional and contemporary home décors.
  • Durability - Solid wood stands up well to years of foot traffic. Wood floors can last for many generations with the proper upkeep.
  • Ease of repair - Solid floor wood floors can be easily repaired, sanded and refinished overtime to restore their beauty. Damaged boards can also be replaced.
  • Good investment - Quality wood flooring adds value to your home. The resale value is significantly higher for homes with this upgrade.
  • Comfort - Wood provides some give and flex as you walk across it, making it softer and more comfortable than tile or laminate flooring.
  • Environmental benefits - Wooden floor is a renewable and sustainable natural material resource. Sustainably-harvested wood floors are an eco-friendly choice.

Safety Precautions

Installing wood floors requires careful safety measures:

  • Use eye and ear protection when cutting boards into position or using power tools. Eyeglasses, safety goggles, earmuffs and dust masks are recommended.
  • Work in a well-ventilated area to minimize dust and chemical fumes. Open windows and use fans or ventilation systems.
  • Follow all power tool safety guidelines. Make sure hands and cords remain a safe distance from blades.
  • Use knee pads and work gloves to protect yourself while kneeling on the floor.
  • Follow lifting precautions and get help moving heavier stacks of wood planks.
  • Carefully sweep up sawdust and debris during the project to prevent slips or falls.

Taking basic safety precautions makes the installation process go smoothly.

Preparation

Proper preparation is crucial for a successful wood floor installation method. Rushing this stage can lead to mistakes and problems down the road.

Checking Moisture Levels of the Subfloor and Wood

Excess moisture is the enemy of wood floors. Water damage, cupping, gapping and other issues can arise if moisture isn't adequately addressed.

Use a moisture meter on the wooden subfloor to check moisture content before installation. Wood should have 6-9% moisture content to be ready for fitting. Subfloors should have less than 12% moisture content for plywood or concrete and less than 15% for OSB board.

If moisture is too high, delay installation until spirit levels drop into the target range. Dehumidifiers, fans and increased ventilation can help speed up the drying process.

Planning the Layout and Cutting of Boards

Decide on the direction you want the boards to run and measure to plan how they’ll be laid out. For the best appearance, run boards perpendicular to the floor joists.

Make sure to allow for a correct expansion gap of 3/4-inch around all vertical adjacent surfaces like walls and cabinets. The wood will naturally expand and contract with air humidity level changes.

Draw a plan layout diagram, including all board lengths and widths. Pre-cut Based on this plan, pre-cuts to size with a power miter saw based on everything ahead of time allows for a cleaner and faster installation. Number each cut board with chalk to match it to your layout drawing.

Installing a Damp-Proof Membrane if Needed

Check if your home requires an additional moisture barrier between the subfloor and wood boards. This provides added protection against moisture damage.

Roll out the membrane liner according to product directions before laying any boards. Run it up the walls a few inches too. Then, the adhesive tape seams together for full coverage.

Check for Any Other Potential Problems with the Subfloor

Inspect the subfloor carefully before installation. Look for warped areas, protruding secret nails, cracks, textures or bumps that could interfere with fitting the wood boards properly. Use a level to check for depressions or uneven spots.

Grind down or fill any flaws so the subfloor is smooth and flat. The better the subfloor prep, the better your finished floor will be.

Laying the Floor

Once all the preparation work is complete, you can lay out your beautiful new solid wood floor!

Positioning Boards into Place and Fitting Them Together Tightly

  • Start installation along your primary wall, ensuring the first row is straight. Use spacers against the wall for the expansion gap.
  • Connect subsequent boards by engaging the tongue and groove edges. Use a rubber mallet or hammer with a tapping block to gently knock plank wood flooring into place.
  • Ensure there are no gaps between boards. Lines should be flush for a proper tight fit.

Measuring Board Widths to Fit in the Row Correctly

  • Rather than having a straight seam the entire floor length, it should be staggered in each row of boards. This creates a more appealing pattern.
  • Measure and cut board widths appropriately so seams don’t align. Plan for at least 6 inches of difference between end joints from row to row.
  • Cut the final board in each row to fit the remaining space before starting a new row.

Attaching Boards Using Nails/Glue/Screws, Depending on the Type of Flooring Chosen

In addition to the tongue and groove system, boards must be attached to the subfloor for maximum stability:

  • Nail-down hardwood – Use 6D nails and a pneumatic flooring stapler/nailer to adhere to the subfloor. Space nails every 4-6 inches along the edges and every 8-10 inches in the board center.
  • Glue-down hardwood – Run a zig-zag bead of wood flooring excess adhesive on the subfloor according to product directions. Press boards into place firmly. Roll the floor with a 100-150 lb. roller after every few rows.
  • Floating engineered wood – Click lock edges together for floating installation without glue adhesive or nails. Screws may be used occasionally through the tongue.

Follow the fastening recommendations specific to your flooring product. Proper attachment keeps the wood floor solid underfoot for decades.

Cutting Off Excess Board Length at Edges with a Straight Edge/Saw Blade

  • When you reach the far wall, cut the final board in each row to the correct width with a power mitre saw for a straight, clean edge.
  • Measure the space carefully so the board fits snugly without leaving gaps along the wall.
  • Use an edge trim saw guide for long rip cuts for wider rooms.
  • Applying Wood Filler Where Necessary to Fill Small Gaps Between Boards
  • Despite best efforts, small gaps sometimes occur due to uneven subfloors or natural wood variations. Use coloured wood putty to fill these spaces for a seamless look.
  • Press the putty into gaps with a putty knife. Wipe away excess, let dry completely, then sand flush with boards. Stain or finish over repairs for an invisible fix.

Securing Skirting Boards Around the Perimeter of the Room

  • Attractive finish off the installation by nailing decorative skirting boards around the entire perimeter of the room. Run quarter-round, baseboard trim or panel moulding to conceal all extra expansion spaces.
  • Miter cut the edges of skirting boards for a clean, professional appearance where they join in corners. Use finishing nails and wood glue for attachment to the wall.

Finishing Touches

Your new wood floor is installed! Now complete the process with these final steps:

  • Vacuum up all sawdust, dirt and debris from sanding. Tack abrasive cloth on the floor to remove the last of the dust for finishing.
  • Apply your choice of sealant – water-based polyurethane offers durable protection that dries quickly with low odour. Follow product directions closely.
  • Apply 2-3 coats of finish, sanding lightly between each coat. Allow ample drying time between layers.
  • If desired, add area rugs, furniture leg covers and other protections to high-traffic areas.
  • Enjoy your beautiful new solid hardwood flooring for many years to come with proper use and care. Refinish as needed to keep them looking like new.

Get inspired to start your flooring project! Browse gorgeous solid wood flooring options at Easystep Flooring UK.

With patience and care, you can install solid wood floors that rival professional quality. Take pride in the beautiful DIY upgrade you’ve provided your home. Your new wood floor will be admired by all who enter and add real value to your property.

Frequently Asked Questions

Q. What type of wood is best for flooring?

A. Oak and maple are two of the most popular choices for wooden flooring. Oak offers durability and a bold grain pattern. Maple is attractive yet subtle. Exotic woods like Brazilian cherry are also striking options.

Q. What tools do I need for installation?

A. Essential tools include a power mitre saw, table saw, jigsaw, nail gun/stapler, rubber mallet, pull bar, tape measure, spacers, and more. Always use proper safety gear, too.

Q. How long does installation take?

A. Proper subfloor prep can install a single room in 1-3 days. Larger homes may take 1-2 weeks. Having an extra time set of hands speeds up the process.

Q. Should I nail, glue, or float the floor?

A. Nailing floors provide the most stability. Glueing them works for concrete subfloors. Floating is an option for engineered flooring wood installed over subfloors with radiant floor heating.

Q. How can I make the boards look seamless?

A. Use wood filler to blend any minor gaps between boards. Pick putty that matches the wood stain colour. Sand smooth after drying.

Q. What’s the best finish for protection?

A. Polyurethane seals and protects wood floors beautifully. Use water-based or oiled floor-based, depending on your needs. Apply 2-3 coats.

Thank you, we have registered your interest.